Categories
mySql PHP Slim Framework Tips & Tricks

Global site settings middleware for Slim Framework v3 with eav data table

Hi there,

I wrote this small middleware code which might help you if you want to store your settings in database and access them everywhere in your application. You can use it in twig template by just typing setting name (what ever you insert into your setting table ) for example {{site_logo}} or in any route.

Here is the middleware code:

app = $app;
    $this->view = $app->getContainer()->get('view');
    $this->pdo =  $app->getContainer()->get('pdo');
    if ( !$this->pdo instanceof PDO ) {
      throw new \RuntimeException (
        sprintf(
          '%s requires a PDO instance, app did not contain "PDO" key',
          __CLASS__
        )
      );
    }
  }
  public function __invoke( $request, $response, $next ) {
    $settings = $this->getSettings();
    if( $settings ) {
      foreach ( $settings as $row ) {
        $this->view->getEnvironment()->addGlobal(
          $row['setting'],
          $row['value']
        );
        $request->withAttribute(
          $row['setting'],
          $row['value']
        );
      }
      $response = $next( $request, $response );
    }
    return $response;
  }
  protected function getSettings() {
    try {
      $stmt = $this->pdo->query( 'SELECT setting, value, description FROM site_settings' );
      return $stmt->fetchAll();
    } catch ( PDOException $pe ) {
      return false;
    }
  }
}

add the middleware to all routes:

$app->add( new entity\SiteSettings( $app ) );

and use it in any route or in view:

<?php
$app->get('/en/admin', function ($request, $response, $args) {
    // Sample log message
    $this->logger->info("Slim-Skeleton '/' route");
    echo $request->getAttribute('site_name');

 });


and here is the sql table:

CREATE TABLE `site_settings` (
	`setting` VARCHAR(250) NOT NULL DEFAULT '' COLLATE 'utf8_unicode_ci',
	`value` VARCHAR(250) NULL DEFAULT NULL COLLATE 'utf8_unicode_ci',
	`description` TINYTEXT NULL COLLATE 'utf8_unicode_ci',
	PRIMARY KEY (`setting`)
)
COLLATE='utf8_unicode_ci'
ENGINE=InnoDB
;
 

Categories
Windows Phone 8.1

Fix for delayed push notification on Windows phone 8.1

I had been experiencing delayed push notifications from Facebook messenger, whatsapp, instagram  etc..

For instance the whatsapp app wouldn’t send any notification unless you open up the app.  Also whatsapp web wouldn’t connect to the phone unless you open up the app. Even if the app allowed to run in background it won’t work. Some goes with other apps. I guess this is a bug which Microsoft will never fix.

So I played around a little bit. I tested possible solutions and found the fix.

Fix is simple;

  1. Go to All Settings > Mobile + SIM > Data roaming options > and select don’t roam
  2. Again while you are in mobile + SIM go to SIM and under Network selection select your network manually.

Restart your phone and everything will go  back to normal.

My phone is Lumia 930. Network: EE (UK), OS version 8.10.1234.375


Categories
Windows 10

If your Windows 10 Start menu or settings stopped working you can try following ways to fix it

After upgrading windows 10 to latest build 1511 (10586.29) I started having problem with the start menu. After a while start menu stops responding as well as cortana, apps and settings. These are the ways I tried and fixed the problem. Don’t forget to backup your files.

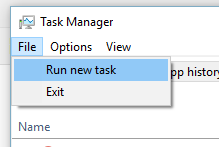
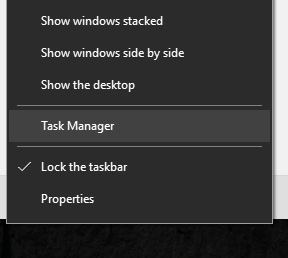
  1. Right click on taskbar and click on Task Manager

  2. Click on File and Run New Task

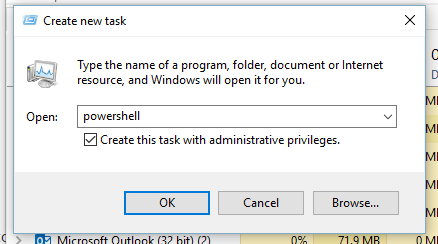
  3. Type powershell, check administrator privileges option to run powershell in admin mode and click Okay.

  4. Run the following command to check/fix your system for errors.  scf /scannow
  5. It might take a while. After it finishes restart your PC. If it doesn’t run the following code: Dism /Online /Cleanup-Image /RestoreHealth
  6. If this gives you 0x800f081f error download windows 10 iso from here.  (Before doing this don’t forget to install latest upgrades)
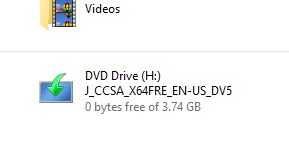
  7. Mount the iso file by right clicking on the iso file and go to Open With and select Internet Explorer. It will create virtual dvd drive with a drive letter. Run the following command: (Replace X with the drive letter. )

    DISM /Online /Cleanup-Image /RestoreHealth /source:WIM:X:\sources\Install.wim:1 /LimitAccess
  8. Restart your PC.
  9. If last step dosen’t work for you reset all the windows 10 apps by running following code: Get-AppxPackage -allusers | foreach {Add-AppxPackage -register “$($_.InstallLocation)\appxmanifest.xml” -DisableDevelopmentMode}

Good Luck.

Categories
About Me Around me

Hi everyone

This is my blog. So, enjoy it.

Categories
Magento

How to display address fields on registration form – Magento

Please create local.xml in your theme layout folder.

Refer the code below in local.xml:

<layout version="0.1.0">

    <customer_account_create> 
      <reference name="customer_form_register">   
        <action method="setShowAddressFields">
          <param>true</param></action>    
      </reference>
    </customer_account_create>

</layout>

or

In customer.xml (current theme layout), add the below code in customer_account_create node:

<action method="setShowAddressFields"><value>true</value></action>

so it look like

<reference name="content">          
    <block type="customer/form_register" name="customer_form_register" template="customer/form/register.phtml">
       <action method="setShowAddressFields"><value>true</value></action>
       <block type="page/html_wrapper" name="customer.form.register.fields.before" as="form_fields_before" translate="label">
             <label>Form Fields Before</label>
        </block>
    </block>
</reference>

Clear the cache after added code.

Please find the _basicCheck function in Mage_Customer_Model_Address_Abstract, this validating the registration required fields, so you have to rewrite this function _basicCheck.

Please refer this link its for telephone field (customize for zipcode field), have a look on this. Hope this will helps

Categories
Development Environment

Web Development Environment

Hi again.

I will share my web development environment with you to help some of you get your work done faster. This was a straggle for me because  I was developing websites with software called xampp and deploying my project using FTP. Fun days. So, I will share the software’s that I have been using happily after. This is a tutorial for beginners. People with experience already have their own way to develop websites. Also I don’t claim that my way is the best way. You need to find best way for yourself and try everything out there.

Softwares:

  1. Sublime Text for coding
  2. git for version control
  3. Vagrant for development servers
  4. I use puphpet for vagrant boxes. It’s easy but sometimes pain in the ass.
  5. git bash for terminal
  6. SourceTree to work with git. (I usually use git-bash terminal for git. It’s some how easier for me)
  7. git-ftp for deploying codes and websites. Since I work alone I see no harm to use git-ftp

Sublime Text:

Light weight, beautiful looking  text editor. It comes almost with nothing but you can Install plugins which saves your times and money.

To be able to install plugins Go to View>Show Console then copy and paste this code hit enter.

Sublime Text 2

import urllib2,os,hashlib; h = 'eb2297e1a458f27d836c04bb0cbaf282' + 'd0e7a3098092775ccb37ca9d6b2e4b7d'; pf = 'Package Control.sublime-package'; ipp = sublime.installed_packages_path(); os.makedirs( ipp ) if not os.path.exists(ipp) else None; urllib2.install_opener( urllib2.build_opener( urllib2.ProxyHandler()) ); by = urllib2.urlopen( 'http://packagecontrol.io/' + pf.replace(' ', '%20')).read(); dh = hashlib.sha256(by).hexdigest(); open( os.path.join( ipp, pf), 'wb' ).write(by) if dh == h else None; print('Error validating download (got %s instead of %s), please try manual install' % (dh, h) if dh != h else 'Please restart Sublime Text to finish installation')

Sublime Text 3

import urllib.request,os,hashlib; h = 'eb2297e1a458f27d836c04bb0cbaf282' + 'd0e7a3098092775ccb37ca9d6b2e4b7d'; pf = 'Package Control.sublime-package'; ipp = sublime.installed_packages_path(); urllib.request.install_opener( urllib.request.build_opener( urllib.request.ProxyHandler()) ); by = urllib.request.urlopen( 'http://packagecontrol.io/' + pf.replace(' ', '%20')).read(); dh = hashlib.sha256(by).hexdigest(); print('Error validating download (got %s instead of %s), please try manual install' % (dh, h)) if dh != h else open(os.path.join( ipp, pf), 'wb' ).write(by)


After you install package control restart Sublime Text and hit ctrl+shift+P if you use windows. Then type install from there click on Package control: Install Package. You will see list of packages. You can install which ever you like.

Categories
VirtualBox Windows Windows 10

VirtualBox won’t start on windows 10 ( Faulting module name: VirtualBox.exe, version: 0.0.0.0, time stamp: 0x5439147c )

You should install VB version 4.3.12 . It worked for me.

https://www.virtualbox.org/wiki/Download_Old_Builds_4_3


Categories
OneNote Windows

OneNote Clipper

Categories
Wordpress

Stop strange charters appearing in wordpress websites

An issue that makes apostrophes appearing as ‘â€TM’ on wordpress websites. This problem occur when you copy and paste text from websites or word documents.

Solution is;

Open up the config.php and comment out the lines which are

define(”DB_CHARSET”, ”utf8”);

define(”DB_COLLATE”, ””);

change them to

//define(”DB_CHARSET”, ”utf8”);

//define(”DB_COLLATE”, ””);


To prevent this happening when you copy text and want to paste it past as text or use ctrl+shift+v.

Categories
VirtualBox Windows 10

How to make Windows 10 full screen on VirtualBox

  1. Switch off Windows 10
  2. Make a note of your Operation System current resolution. Let’s say 1900×1080
  3. Go to the VirtualBox installation folder open command prompt in the folder. Usually in C:Program FilesOracleVirtualBox or Open up a command Prompt and navigate to folder where VBoxManage.exe is..
  4. Type this command into the command prompt: VBoxManage.exe setextradata “VM-Name” CustomVideoMode1 1920x1080x32
  5. Open up the Windows 10 and from resolution center change the resolution to your new resolution.